Azure IoT Edge is a relatively new addition to the Azure IoT cloud solution and it is meant be used to analyze data on devices "at the edge" instead of in the cloud.
Azure IoT Hub
IoT Hub is a managed service offered by Microsoft as part of an Azure cloud subscription. It is hosted in the cloud and it acts as a central message hub for bi-directional communication between your application and the IoT devices it manages.
You can use the IoT Hub to build various IoT solutions with reliable and secure communications between a multitude of IoT devices and cloud-hosted applications.
Azure IoT Edge
Overview
Azure IoT Edge enables you to move parts of your workload to the edge, so your devices can spend less time sending messages to the cloud and react more quickly to events. It is built on top of a container-based architecture and uses individual containers perform workloads on the Edge device and to communicate with the cloud.
You can conveniently package your business logic into standard containers, then you can deploy those containers to any of your devices (as custom modules) and monitor it all from the cloud.
Why IoT Edge
There are some clear benefits to using a solution like IoT Edge to enable processing of data on the devices themselves instead of bulk-transferring everything and processing in the cloud. The devices can react quickly to events, such as changes in the local setup or environment, and also reduce bandwidth costs by avoiding to transfer all raw data. You can clean and aggregate the data locally then only send the insights to the cloud for analysis.
- Docker compatible
Since it is built on a container engine (compatible with Docker), it is very versatile and it can be used for any number of purposes which involve streaming of data and analytics, in real-time. A device doesn't necessarily have to be an IoT device with sensors, it can be any machine running Docker, other on Linux/MacOS or Windows. - Open-source
The entire thing is open-source on Github, and there are several additional tools to assist you in building your apps, such as the IoT Edge Dev Tool, an AI toolkit for IoT Edge, an IoT Edge extension for VS Code, and plenty of code samples. There is of course also ample documentation, a CLI tool, and a number of tutorials available. - Integrated solutions
For me personally, another big selling point, besides being open-source, is the ease of use and availability of integrated solutions. I have worked on a project not to long ago where we were building a complex industrial data analytics platform, also using edge devices, but with all the services being deployed using Kubernetes (in Azure) and our own streaming services built around RabbitMQ.
While building a distributed, bi-directional cloud platform using Kubernetes provides many opportunities in terms of flexibility, control, and scaling, I found it to be a very complex and costly endeavor. Azure IoT Edge provides most of the basic functionality in a highly integrated and reliable manner, with built-in security. Everything is built with open-source libraries, using Docker compatible containers, and the communication is done over AMPQ protocol (same as RabbitMQ), with fallback to Websockets and HTTP. There are tools available in the Azure portal to monitor devices in real-time and to issue deployments.
Running Azure IoT Edge on Ubuntu 18.04
For the purpose of this article, I am using Ubuntu 18.04 as an Edge device to run the IoT Edge runtime and communicate with the Azure cloud environment.
An Azure subscription is also needed. If you don't have one, create a free account before you begin.
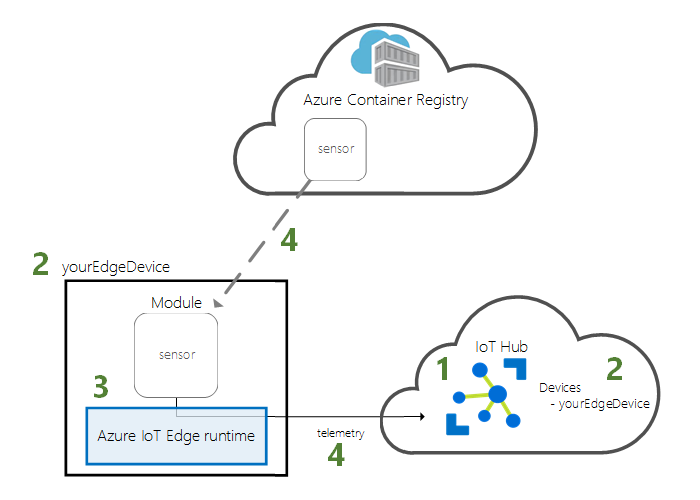
Azure IoT Edge Architecture
The IoT Edge components can be split up into three main parts:
- A cloud-based interface – available as part of the IoT Hub platform in the Azure Portal, which enables you to remotely monitor and manage IoT Edge devices.
- The IoT Edge runtime runs on each IoT Edge device and manages the modules deployed to each device.
- IoT Edge modules are docker-compatible containers that are deployed to IoT Edge devices and execute locally on those devices. Custom business logic is packaged as docker containers and deployed as Edge modules on the device.
We'll mostly focus on installing the IoT Edge runtime on the device (in this case a machine running Ubuntu 18.04) and connecting it to the IoT Hub so we can monitor it. The cloud-based interface is already available in Azure and there isn't anything to install, only a matter of setting it up and using its functions.
Internally, the runtime is made of two individual modules, which are used to communicate with the cloud and also as a gateway for other additional modules which can deployed on the device. Both the runtime and custom modules run independently as docker-compatible containers.
The IoT Edge runtime
The Edge Runtime is a service which controls a set of components (an edgeAgent and an edgeHub), with which it maintains the connection to the IoT Hub in a secure way and on top of a scalable architecture.
The components of the Runtime are docker-compatible containers which run as independent modules and communicate with each other via events and messages. The runtime includes 2 system modules and a variable number of custom modules. The central Azure IoT Hub handles registration and deployment of the custom modules, using a Docker container registry, like the Azure Container Registry or Docker Hub.
IoT Edge Runtime Modules
These modules are automatically made available by the runtime and manage both the connection to the IoT Hub and also the communication between the custom modules and the IoT Hub.
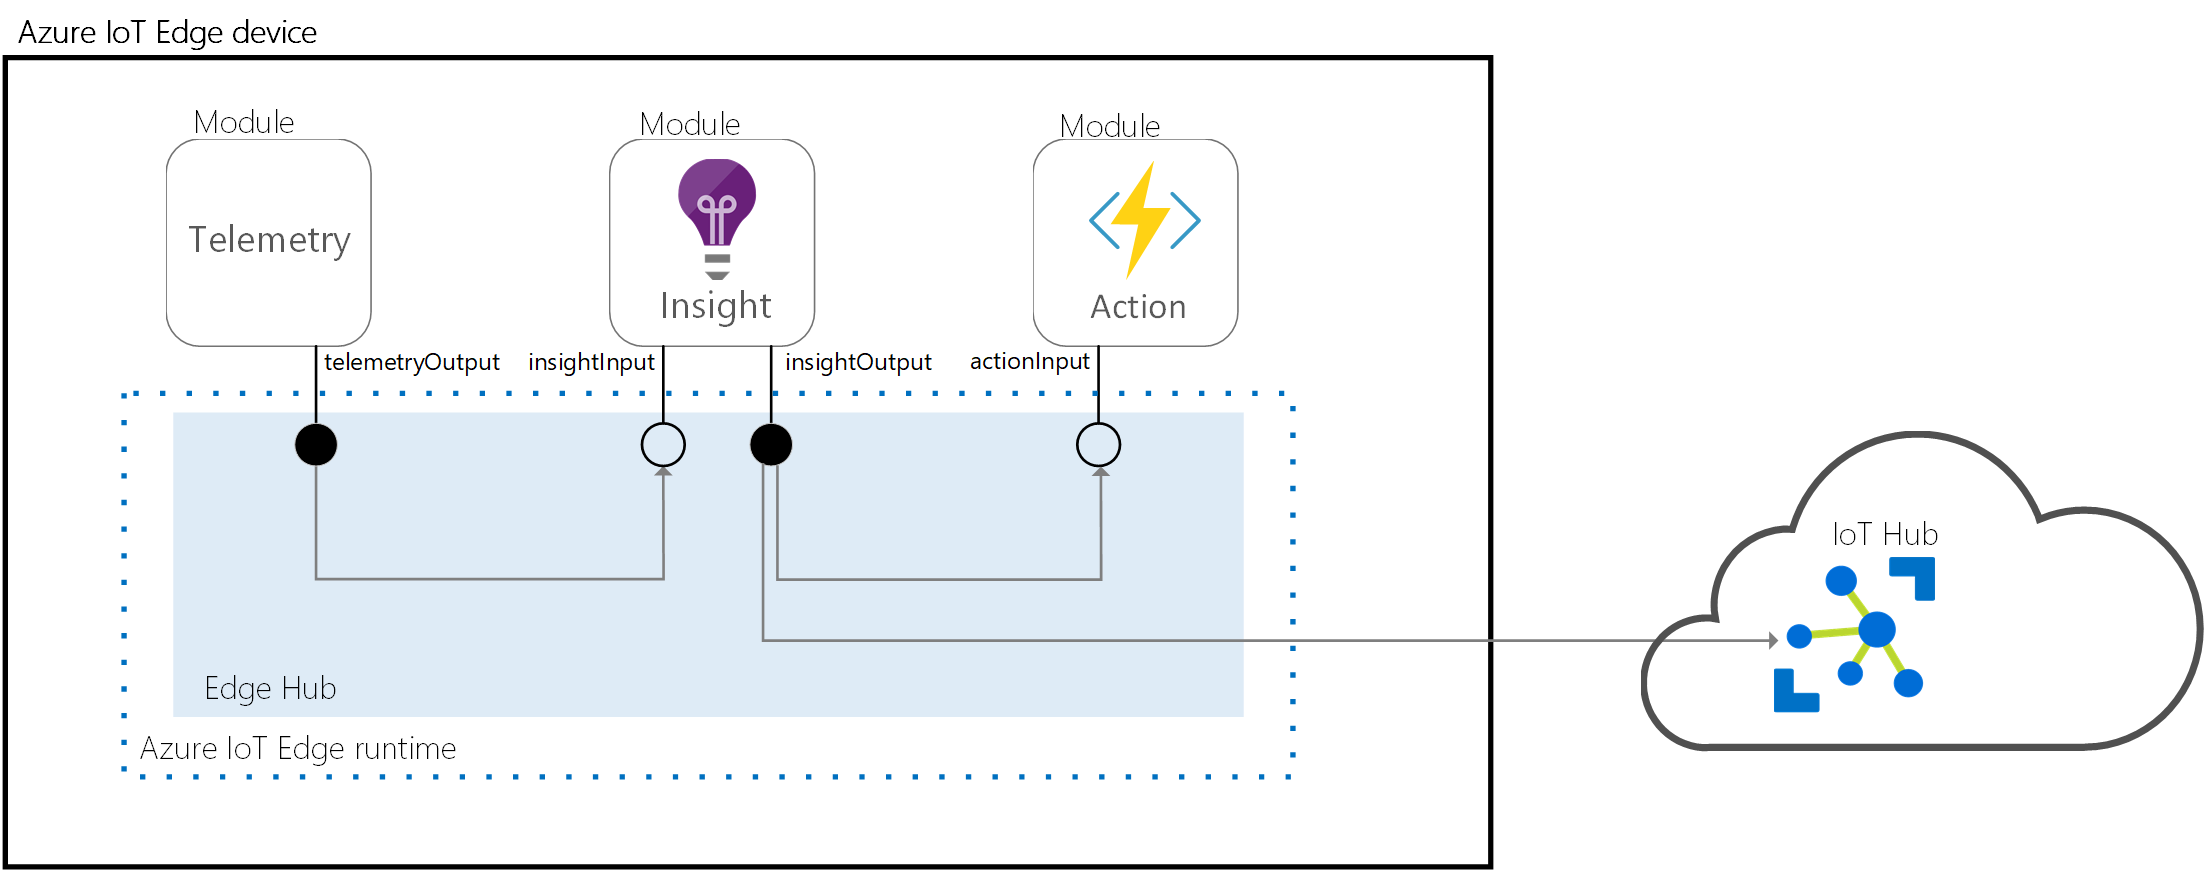
1. Edge Hub
The IoT Edge hub acts as a local proxy for IoT Hub by exposing the same protocol endpoints as IoT Hub. It has built-in mechanisms for optimising how messages are sent between custom modules and the actual IoT Hub in the cloud, and also it is responsible for connection handling and buffering messages that are sent during connection downtimes.
The IoT Edge hub also facilitates module to module communication and acts as a message broker, enabling developers to keep modules independent from each other.
2. Edge Agent
The IoT Edge agent is responsible for instantiating custom modules, ensuring that they continue to run, and reporting the status of the modules back to IoT Hub.
It also plays a critical role in the security of an IoT Edge device. You can refer to the IoT Edge runtime page on the official docs to learn more about the its architecture.
Installing the IoT Edge runtime
We have reached the hand-on, action packed section of the article, or maybe you have skipped all the introductory stuff and landed here directly. I know I do that sometimes, often enough.
There is ample documentation and instructions on the official Microsoft docs website for how to install the IoT Edge runtime on Linux, on Debian-based systems, and so we'll start from there.
As it is mentioned on the Microsoft docs page and as we'll see later on, the runtime is what turns the machine into an IoT Edge device, which means it can be a variety of devices or platforms that are able to run Docker.
I chose Ubuntu 18.04 as it is a fairly popular Linux system and it is available as either a full server machine, a VM, and even as a Raspberry PI. I also find it quite easy and very reliable as a host to run Docker on.
Alright then, so let's get started, shall we? Most of the steps below are taken from the official docs, but I find is convenient to have everything in one page.
1. Register Microsoft key and software repository feed
Open a terminal and run the command below to install the repository configuration:
curl https://packages.microsoft.com/config/ubuntu/18.04/multiarch/prod.list > ./microsoft-prod.listCopy the generated list:
sudo cp ./microsoft-prod.list /etc/apt/sources.list.d/Install Microsoft GPG public key:
curl https://packages.microsoft.com/keys/microsoft.asc | gpg --dearmor > microsoft.gpg
sudo cp ./microsoft.gpg /etc/apt/trusted.gpg.d/
2. Install a container runtime
Azure IoT Edge relies on an OCI-compatible container runtime which needs to be present on the machine to be used as an Edge device. For production scenarios, Microsoft recommended the Moby-engine, which is the same open source framework that Docker is built on. Docker CE/EE container images are compatible with the Moby runtime.
Update package lists on your device:
sudo apt-get updateInstall the Moby engine:
sudo apt-get install moby-engineIf you already have Docker installed, the above will replace the existing Docker container engine.
Install the Moby command-line interface (CLI). The CLI is useful for development but optional for production deployments:
sudo apt-get install moby-cli3. Install the Azure IoT Edge Security Daemon
This step installs the iotedge package. It is the IoT Edge security daemon that provides and maintains security standards on the IoT Edge device.
The daemon starts on every boot and bootstraps the device by starting the rest of the IoT Edge runtime. It also installs the IoT Edge agent component of the runtime, which is mentioned previously.
Update package lists on your device:
sudo apt-get updateInstall the iotedge:
sudo apt-get install iotedgeDepending on your system configuration, you might get at this point an error about unmet dependencies, a bit like so:
The following packages have unmet dependencies:

iotedge :
  Depends: libssl1.0.0 (>= 1.0.2~beta3) but it is not installable
  Depends: libiothsm-std (= 1.0.9.5-1) but it is not going to be installed

E: Unable to correct problems, you have held broken packages.
I managed to resolve this error by manually installing the libssl1.0.0 package.
Add 18.04's main repository using:
echo "deb http://security.ubuntu.com/ubuntu bionic-security main" | sudo tee -a /etc/apt/sources.list.d/bionic.listUpdate repository cache and check if libssl1.0.0 is now available:
sudo apt update
apt-cache policy libssl1.0.0
Install libssl1.0.0:
sudo apt-get install libssl1.0.0
If successful, try and install iotedge again.
4. Configure the security daemon
Upon successful installation, a message like this will appear, telling you that you need to configure and provision your new IoT Edge device.
=======================================================================

                              Azure IoT Edge

  IMPORTANT: Please update the configuration file located at:

    /etc/iotedge/config.yaml

  with your device's provisioning information. [...]
Provisioning your IoT Edge Device
The official docs mention two options to provision your device: manual (where you need to edit and config file mentioned above) and automatic (where you can provision multiple devices automatically, in case you have several).
We'll only focus on the manual step. At this point you need to have a device created in the IoT Hub, which is part of the Azure portal.
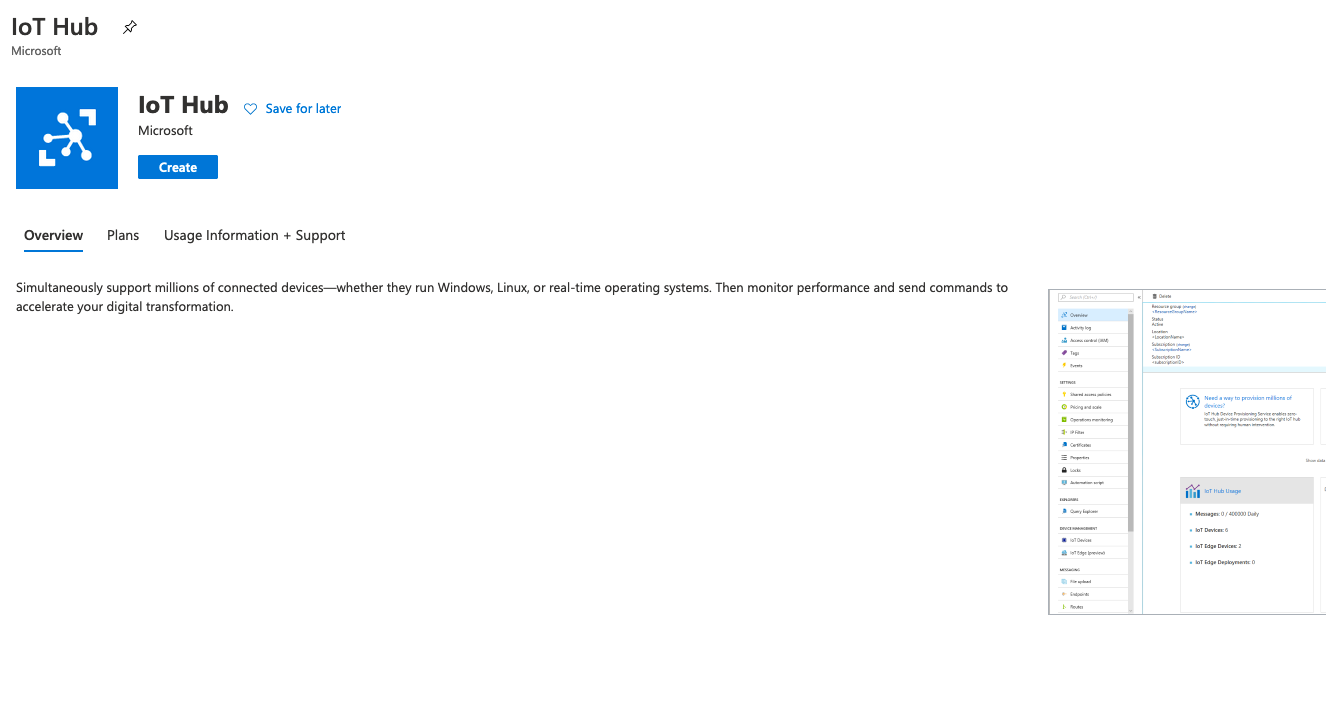
1. Creating the IoT Hub
Go to portal.azure.com, login with your account and select the Azure subscription you will use (you should have at least a free trial available, otherwise create one).
You need to create IoT Hub before you can create the IoT Edge device. Click on the Create resource button and select IoT Hub (you will also need a resource group, but you can create one within the same flow). You should end up on this page:
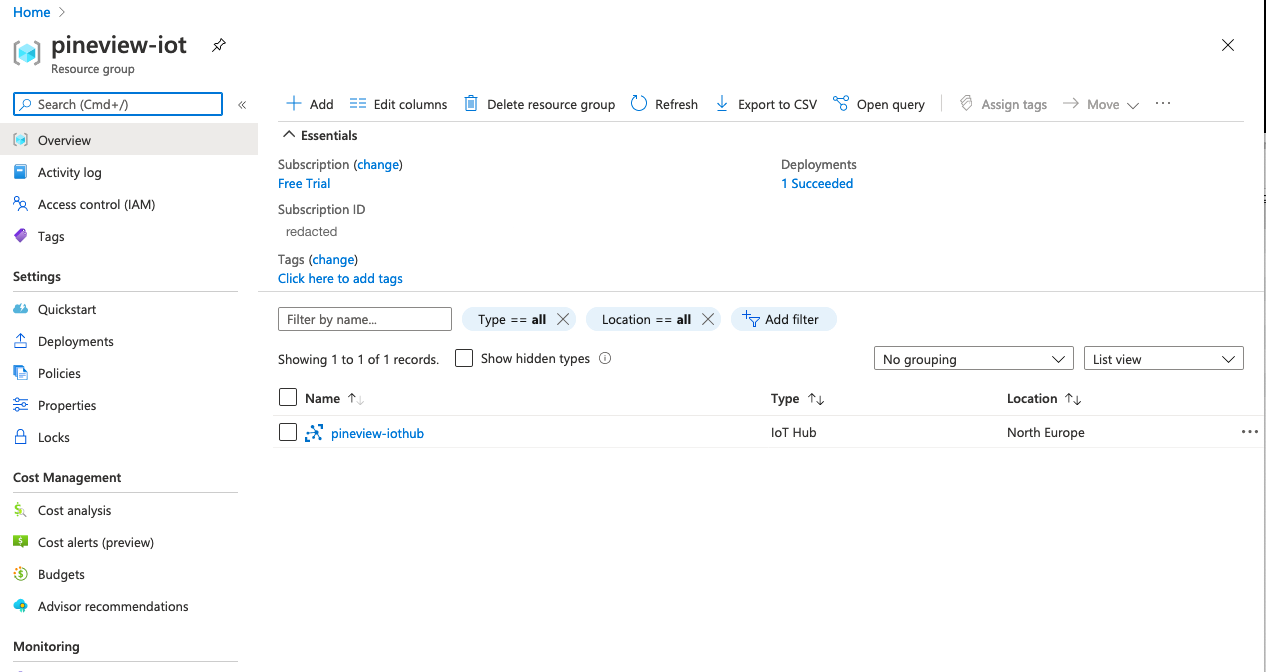
Give the IoT hub a name and follow the other instructions. It might take a few minutes before the job is done. Once the IoT Hub is created you can see it in the resource group which you have selected during the creation phase.
It should look like in the picture below. This is the resource group which I have used for this article. The "pineview-iothub" is available in the list of resources.
2. Creating the IoT Edge device
Next it is time to create the IoT Edge device itself. Click on the IoT Hub and go to its page. From the menu on the left hand side, select "IoT Edge" from under the "Automatic Device Management" section.
You will end up on the main IoT Edge cloud interface, where you will be able to create devices and manage deployments for your devices.
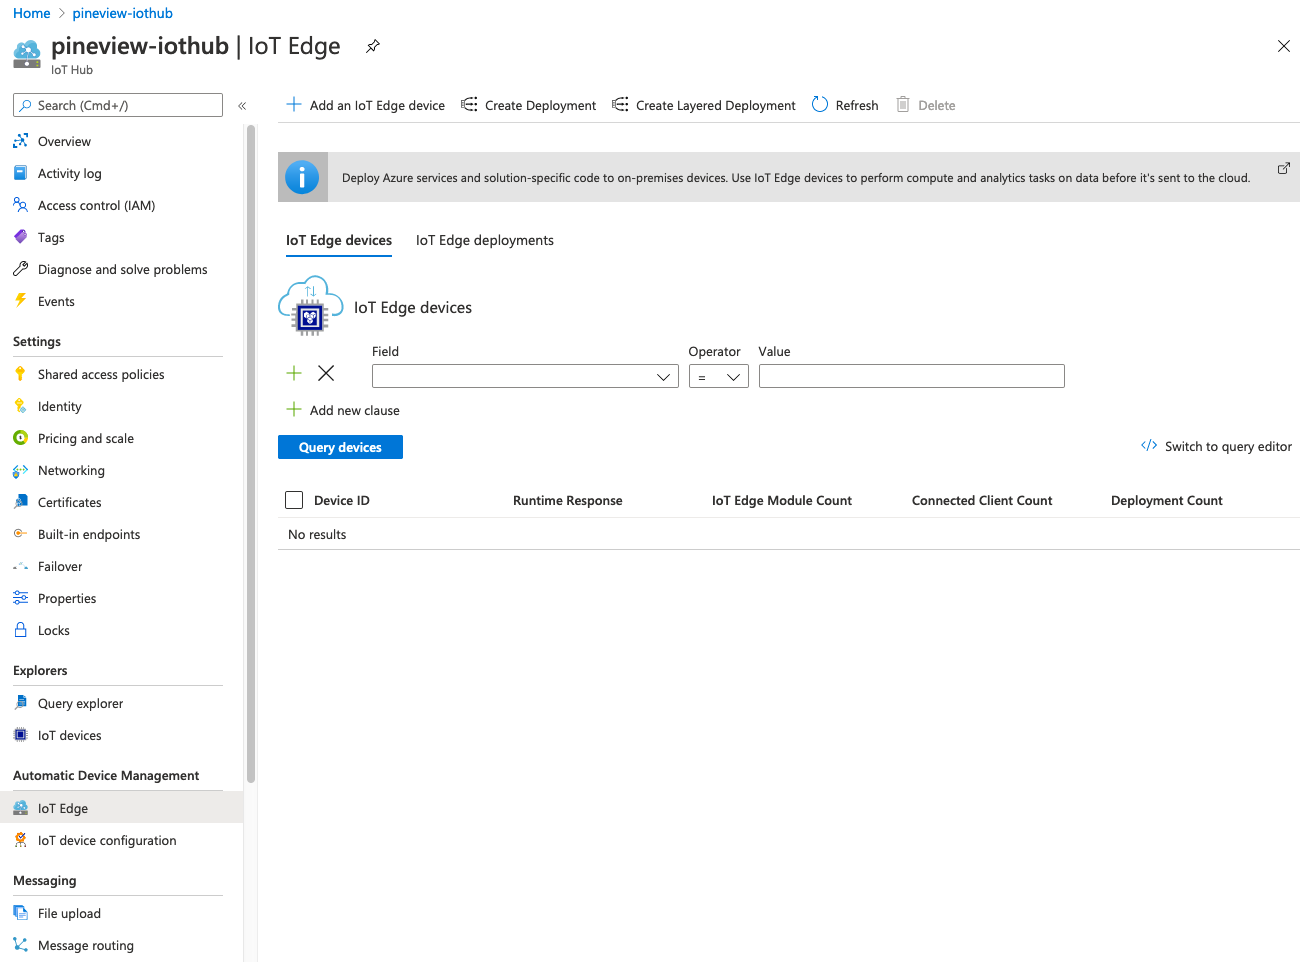
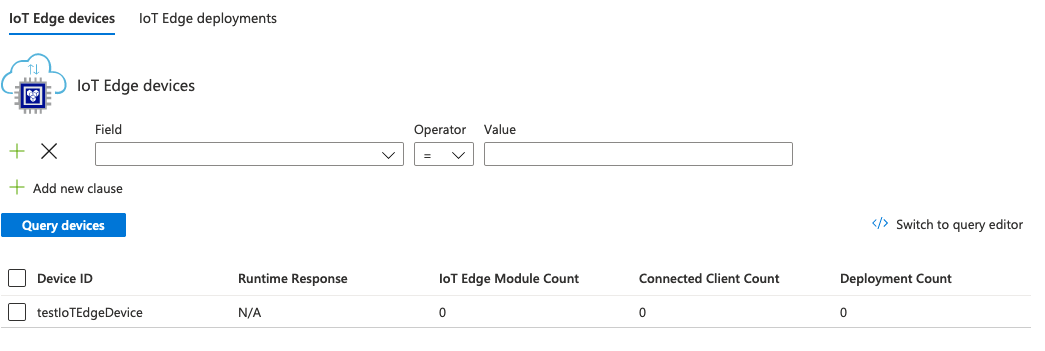
To create your device, click on the "Add an IoT Edge device" button and follow the instructions in the dialog. You only need to fill in the ID of the devices, let's say testIoTEdgeDevice. Once the device is created you will be returned to the previous page and you will see the new device in the list.
At this point we need to grab the device connection string and paste it in the config.yaml file which was created in the previous section. Click on the device ID to go to its page, where you can configure it and also do management stuff, like deploying modules.
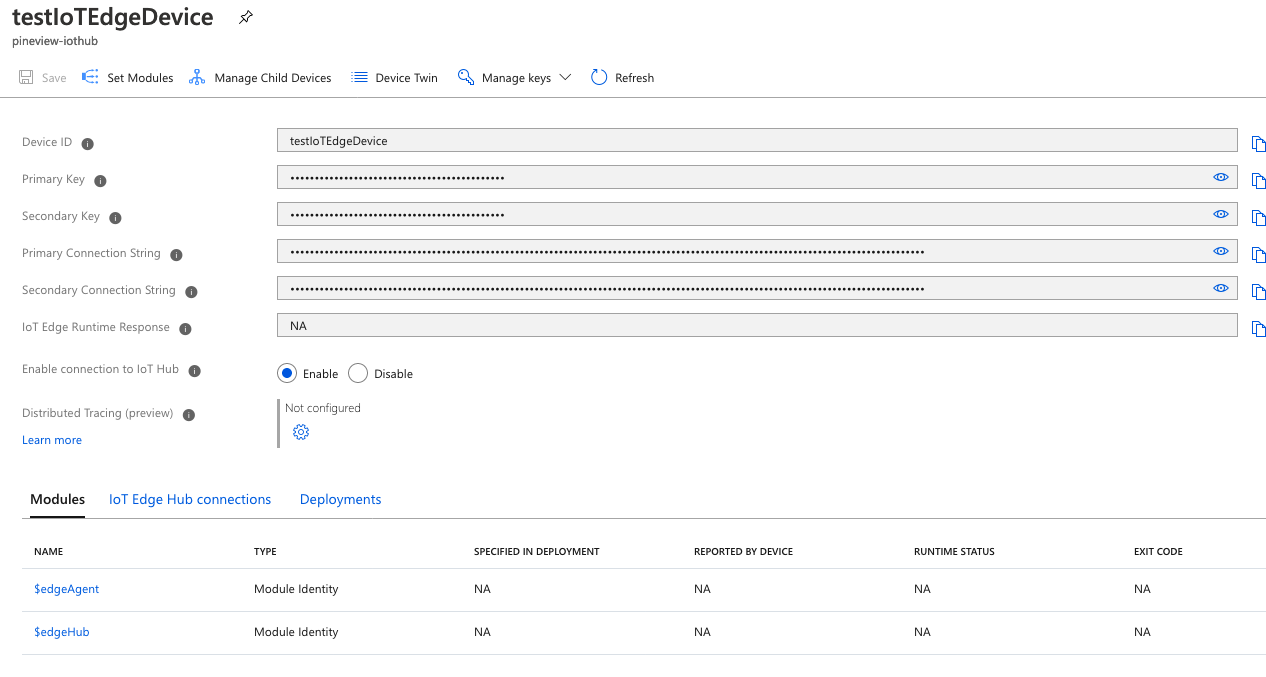
Here you can see the $edgeAgent and $edgeHub modules part of the IoT Edge runtime, mentioned previously.
3. Update the IoT Edge device configuration
Copy one of the connection strings and go back to the terminal and open the configuration file.
sudo nano /etc/iotedge/config.yamlFind the provisioning configurations of the file and uncomment the Manual provisioning configuration section. Update the value of device_connection_string with the connection string copied. Make sure any other provisioning sections are commented out.
# Manual provisioning configuration
provisioning:
  source: "manual"
  device_connection_string: "<ADD DEVICE CONNECTION STRING HERE>"
After entering the provisioning information in the configuration file, restart the daemon:
sudo systemctl restart iotedge4. Verify successful installation
You can check the status of the IoT Edge Daemon:
systemctl status iotedgeYou can use the troubleshooting tool to check for networking or configuration errors:
sudo iotedge check
Starting the IoT Edge hub module
At this point, you will probably see an error like this:
Error: could not execute list-modules request: an error occurred trying to connect: Connection refused (os error 111)Also if you run docker ps you will notice that the $edgeHub system module is not running. This is because the IoT Edge hub component of the runtime is installed once a deployment has been issued.
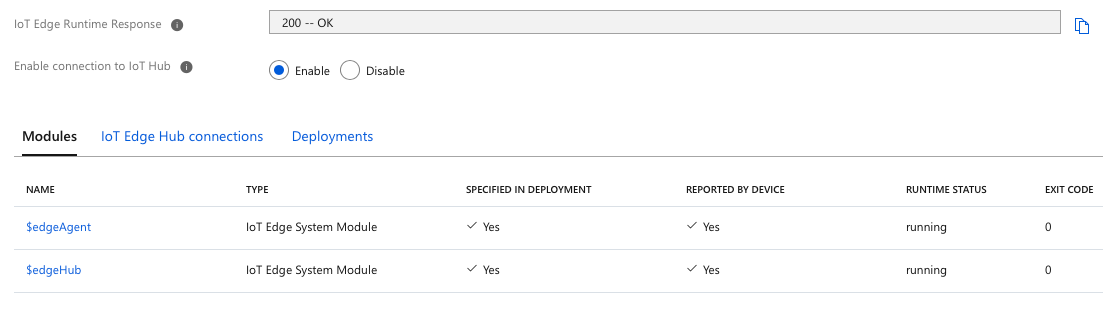
In addition, looking at the previous screenshot, you'll notice that the "IoT Edge Runtime Response" field is listed as NA.
However, in order to quickly enable the IoT Edge hub module so we can have a successful status in the IoT Hub cloud interface, we can issue an empty deployment. In the previous page, click on the Set Modules button and just hit "next" until you get to the "submit" button. A deployment with no other modules will be created, but edgeAgent and edgeHub will be started, and you will not get the "417" error status.
And this is the final step at which point there is a successful connection between the cloud and the IoT Edge device.
Next steps are to dive in to the IoT Edge modules and how to build your own.